Email Password Authentication in React using MongoDB Realm
Build a full-stack app using MongoDB Realm GraphQL (without worrying about servers at all) - Part 1


Hi there, I am Sourabh Bagrecha from the city of lakes Udaipur, currently working as a Software Engineer at MongoDB. One of the things I enjoy the most is building full-stack apps using React.js, Node.js, and MongoDB. And every time I start a new project I find myself spending a lot of time on a very basic and common feature you will find in every other application out there: Authentication.
Implementing authentication in your app usually requires you to create and deploy a server while making sure that emails are unique, passwords are encrypted and sessions/tokens are managed securely.
But in an ideal scenario, your time as a developer should be spent on implementing features that matter to your customer and not on reinventing the wheel on your own.
With MongoDB Realm you don’t have to worry about that. All you have to do is just plug Realm Web into your React app and you are all set to rock!
This article will be an introduction to the world of MongoDB Realm by building an expense manager application called Expengo.
This is the first part of a 3-part-series tutorial, each focusing on several features that MongoDB Realm offers.
- How to enable Email Password Authentication in React app using MongoDB Realm
- How to perform CRUD operations in your Expense manager using Realm GraphQL
- How to perform advanced analytics and deploy/host your application on the Realm backend for free
In this tutorial, you will learn how to connect your React app with MongoDB Realm and perform authentication without even writing a single line of server code.
How can MongoDB Realm and Atlas help us?
MongoDB Atlas is a multi-cloud database service that simplifies deploying and managing MongoDB databases. However, MongoDB Realm's Application Services are integrated with Atlas and provide secure serverless backend services and APIs to save you hours of coding. MongoDB Realm provides several authentication providers such as Google, Apple, Facebook, etc. For this tutorial, we will be choosing the Email/Password, authentication provider.
Deploy your free tier Atlas cluster
If you haven’t already, deploy a free tier MongoDB Atlas Cluster by following the steps mentioned here. This will allow us to store and retrieve data from our database deployment. You will be asked to add your IP to the IP access list and create a username/password to access your database. Once a cluster is created, you can now create a Realm app and link to it.
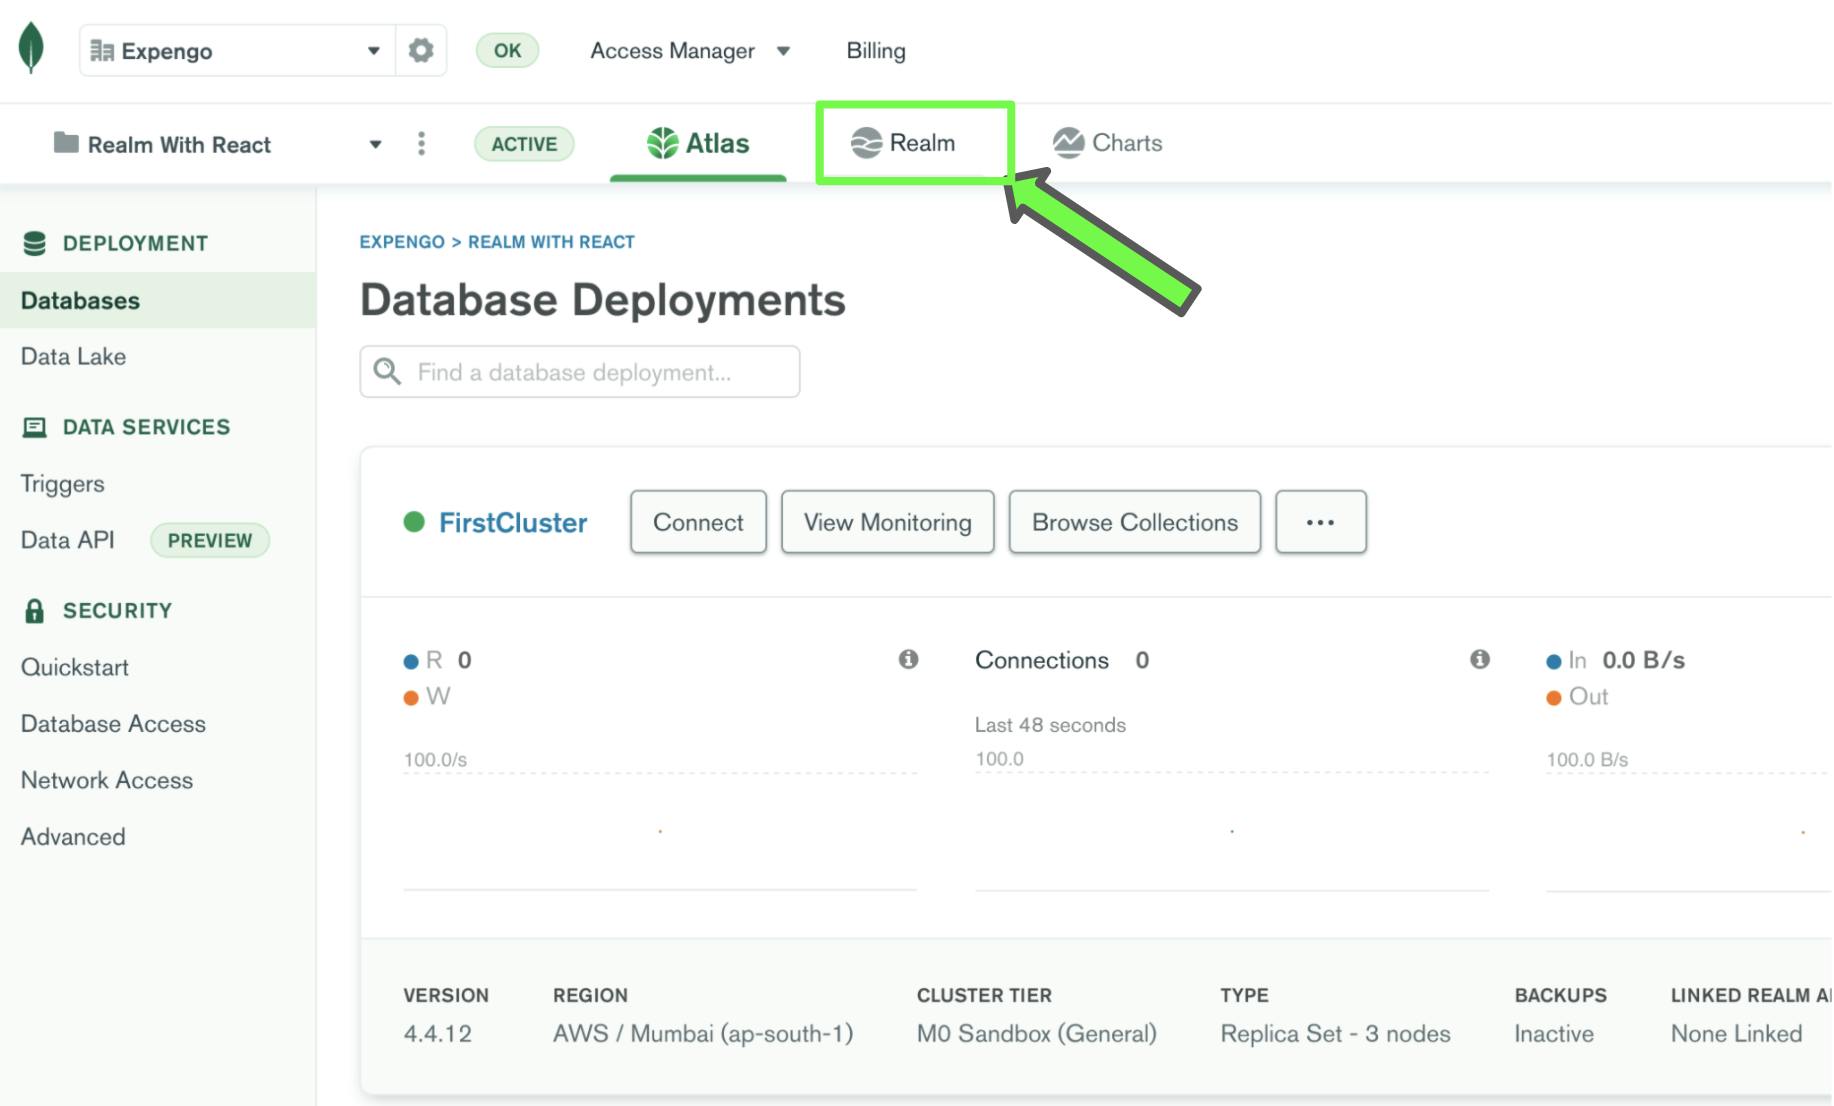
Setup your Realm app
1.) Now, click on the “Realm” tab as mentioned in the image below:
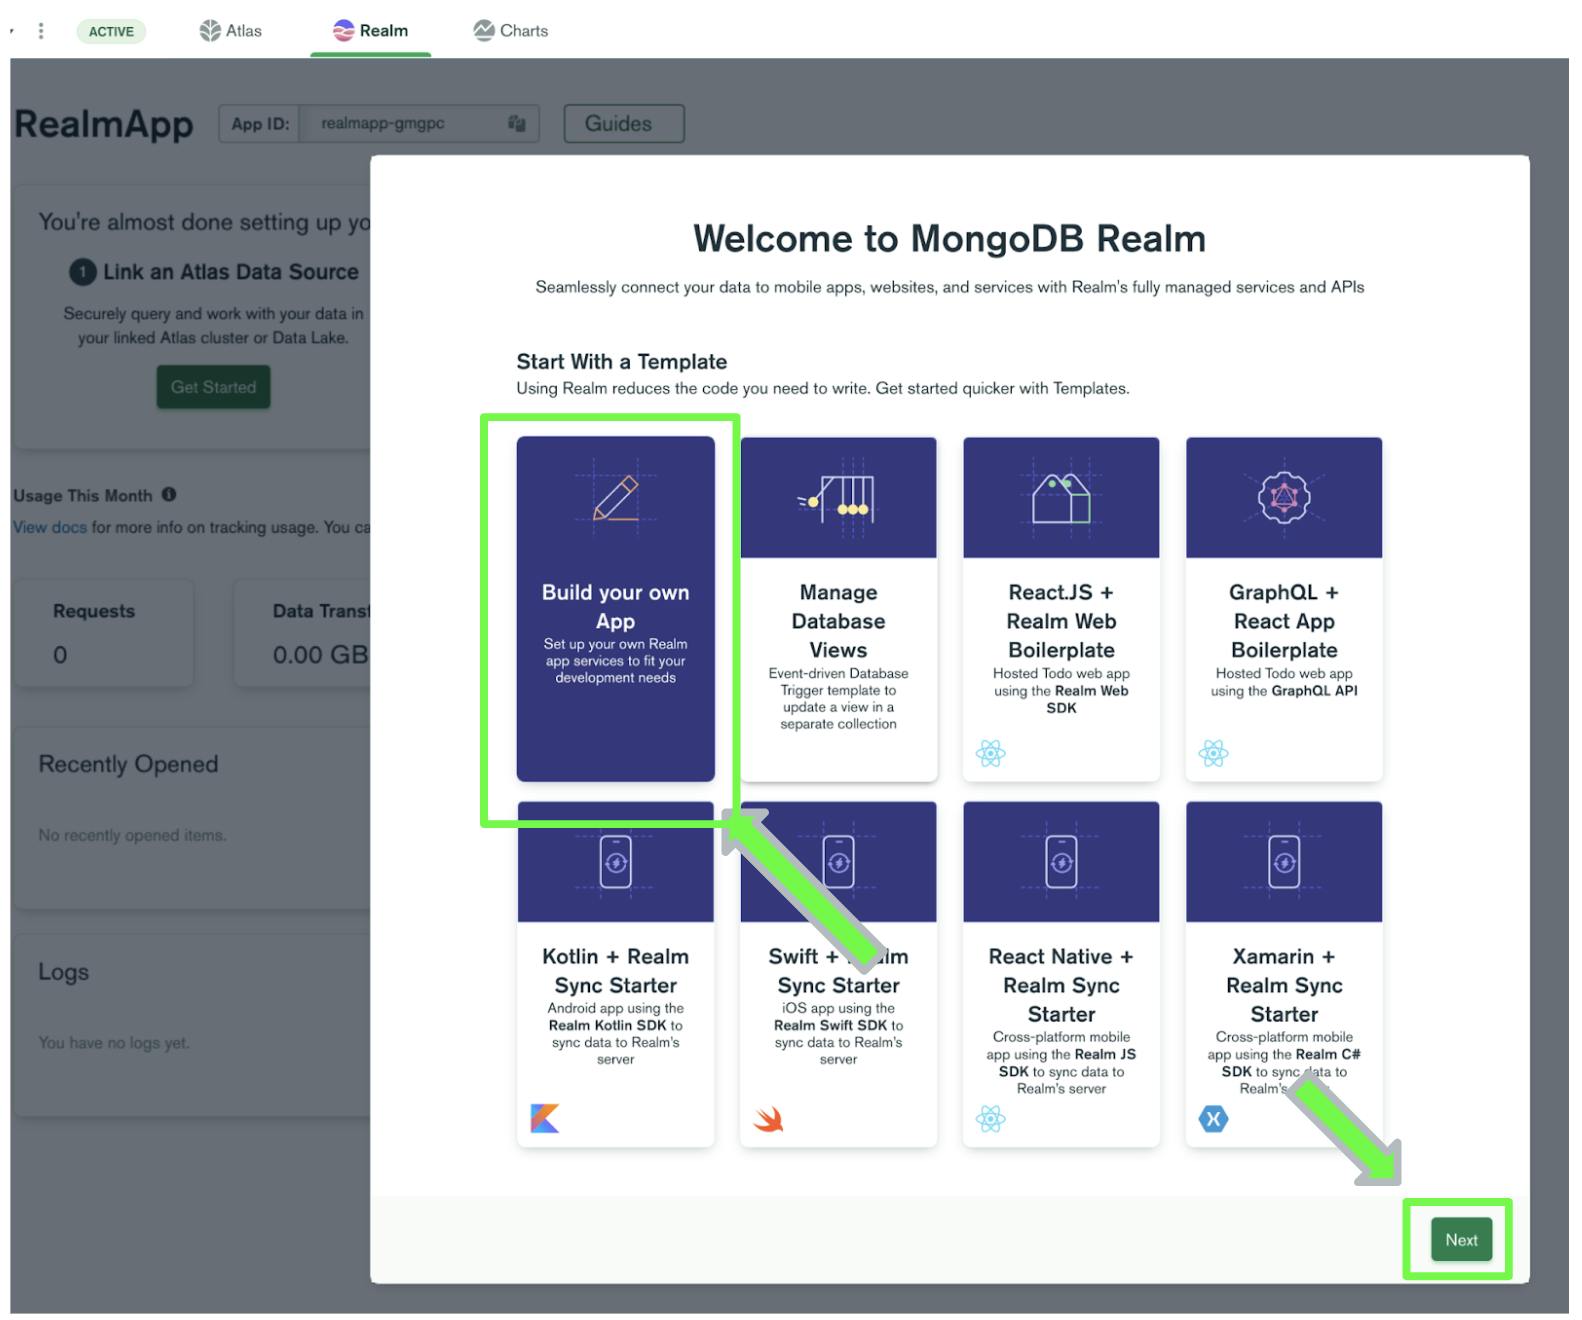
2.) There are a variety of templates one can choose from. For this tutorial, we will continue with the "Build your own App" template and click "Next".
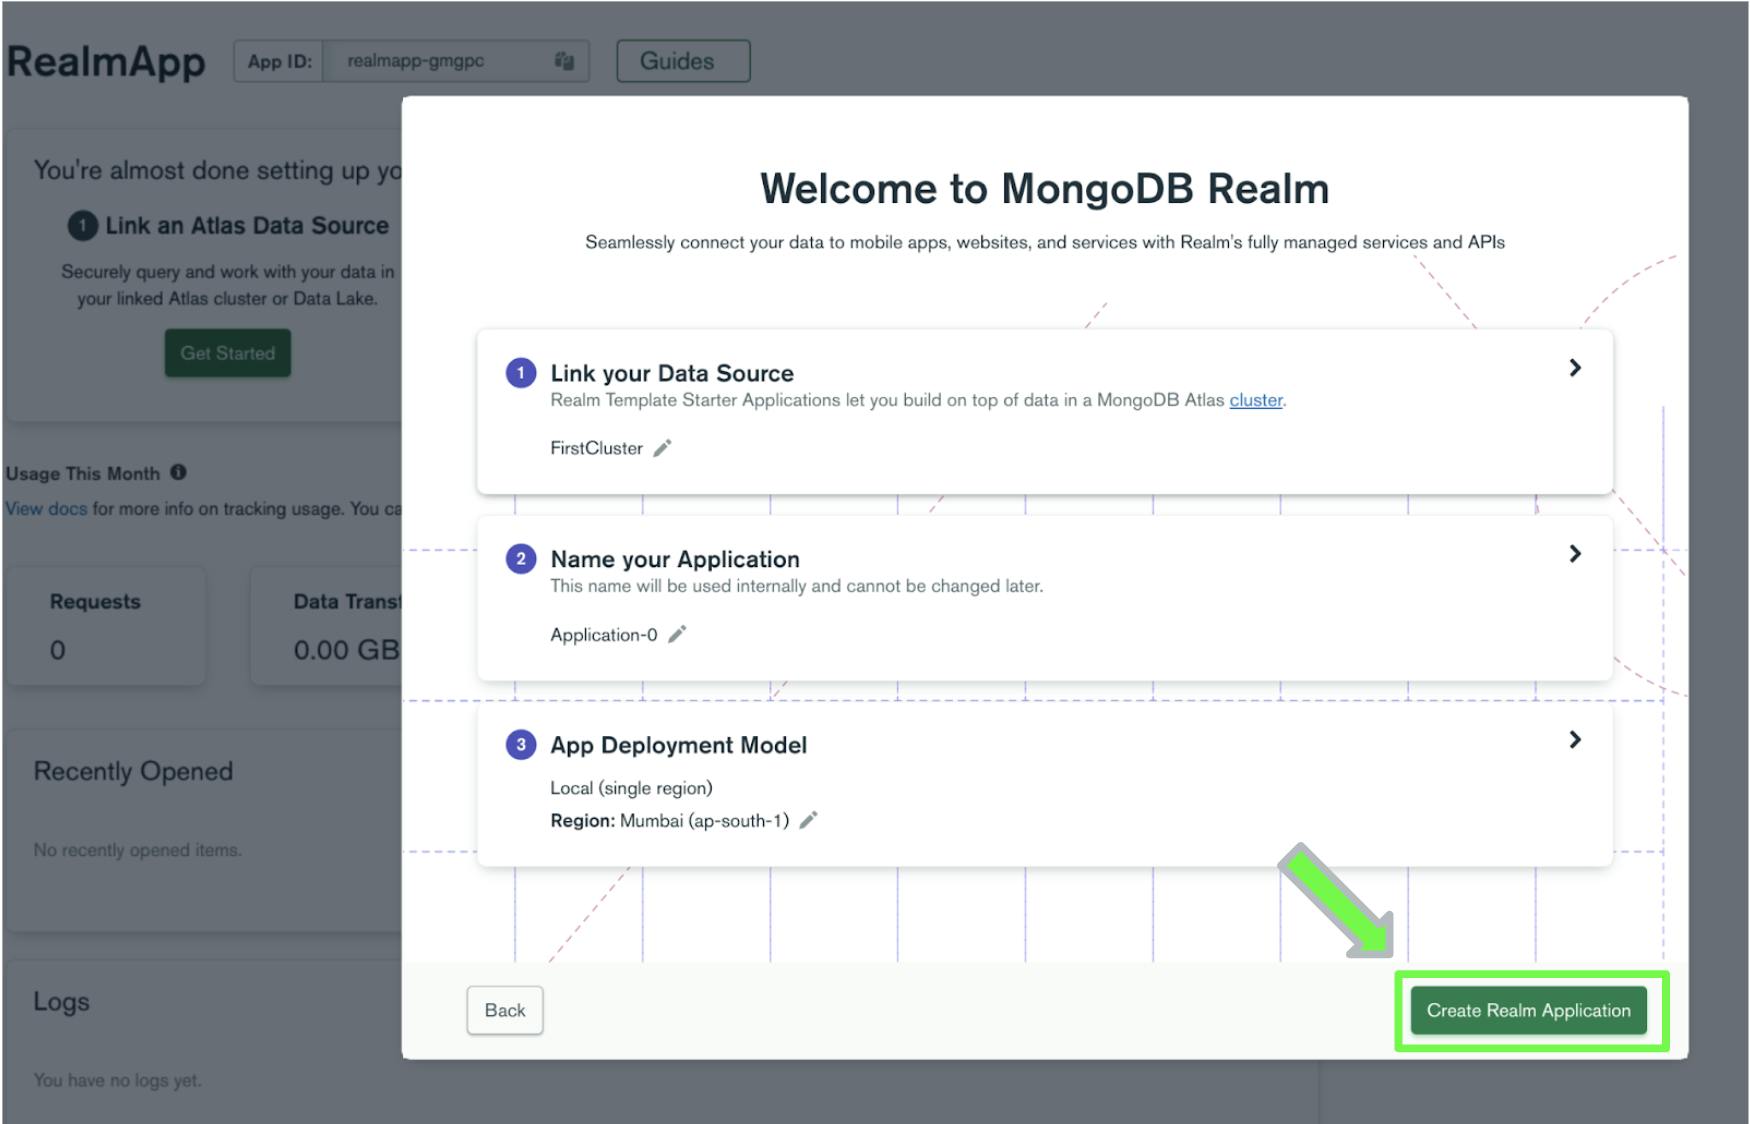
3.) Add application information in the next pop-up and click on “Create Realm Application”
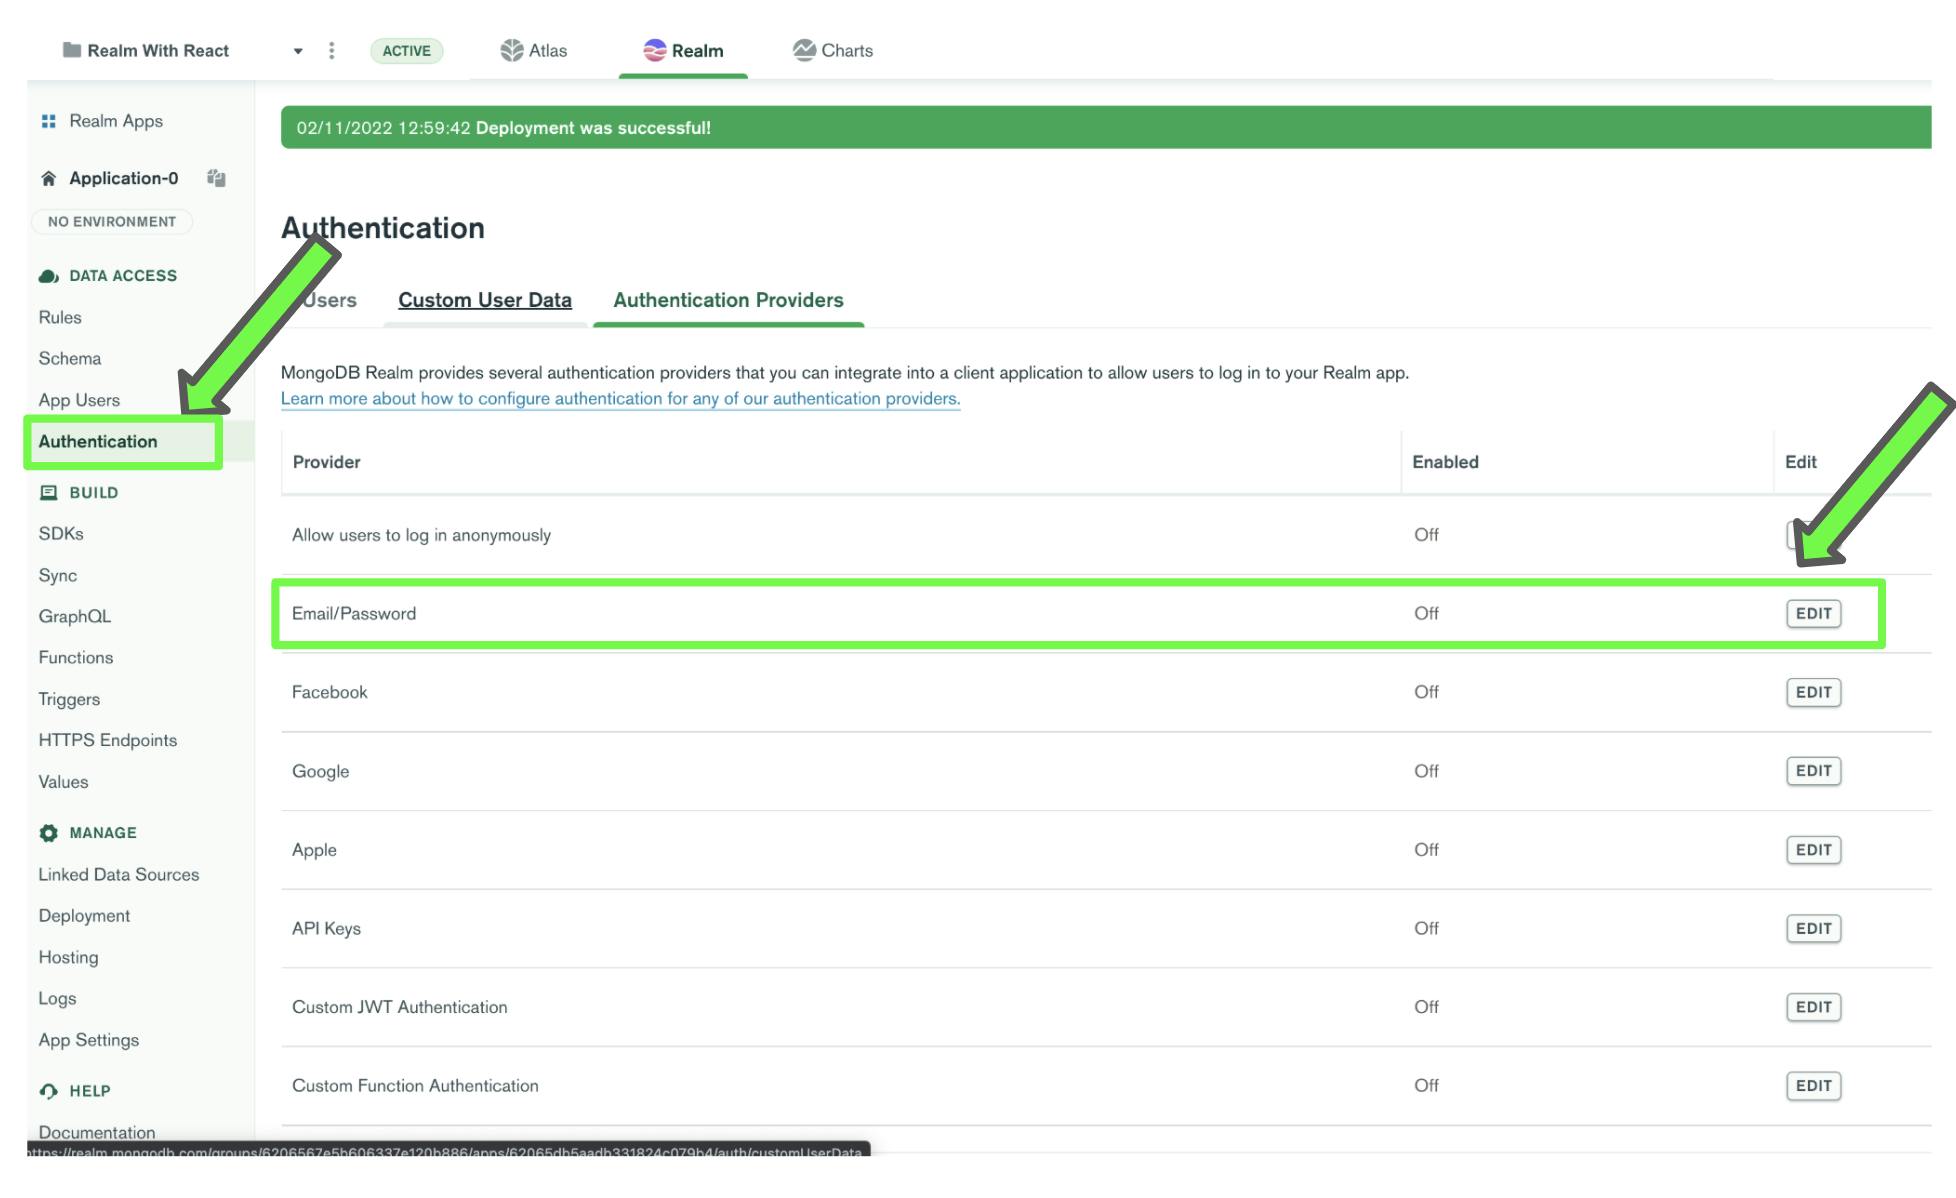
4.) Now click on “Authentication” in the side-bar and then click on the “Edit” button on the right side of Email/Password in the list of Authentication Providers
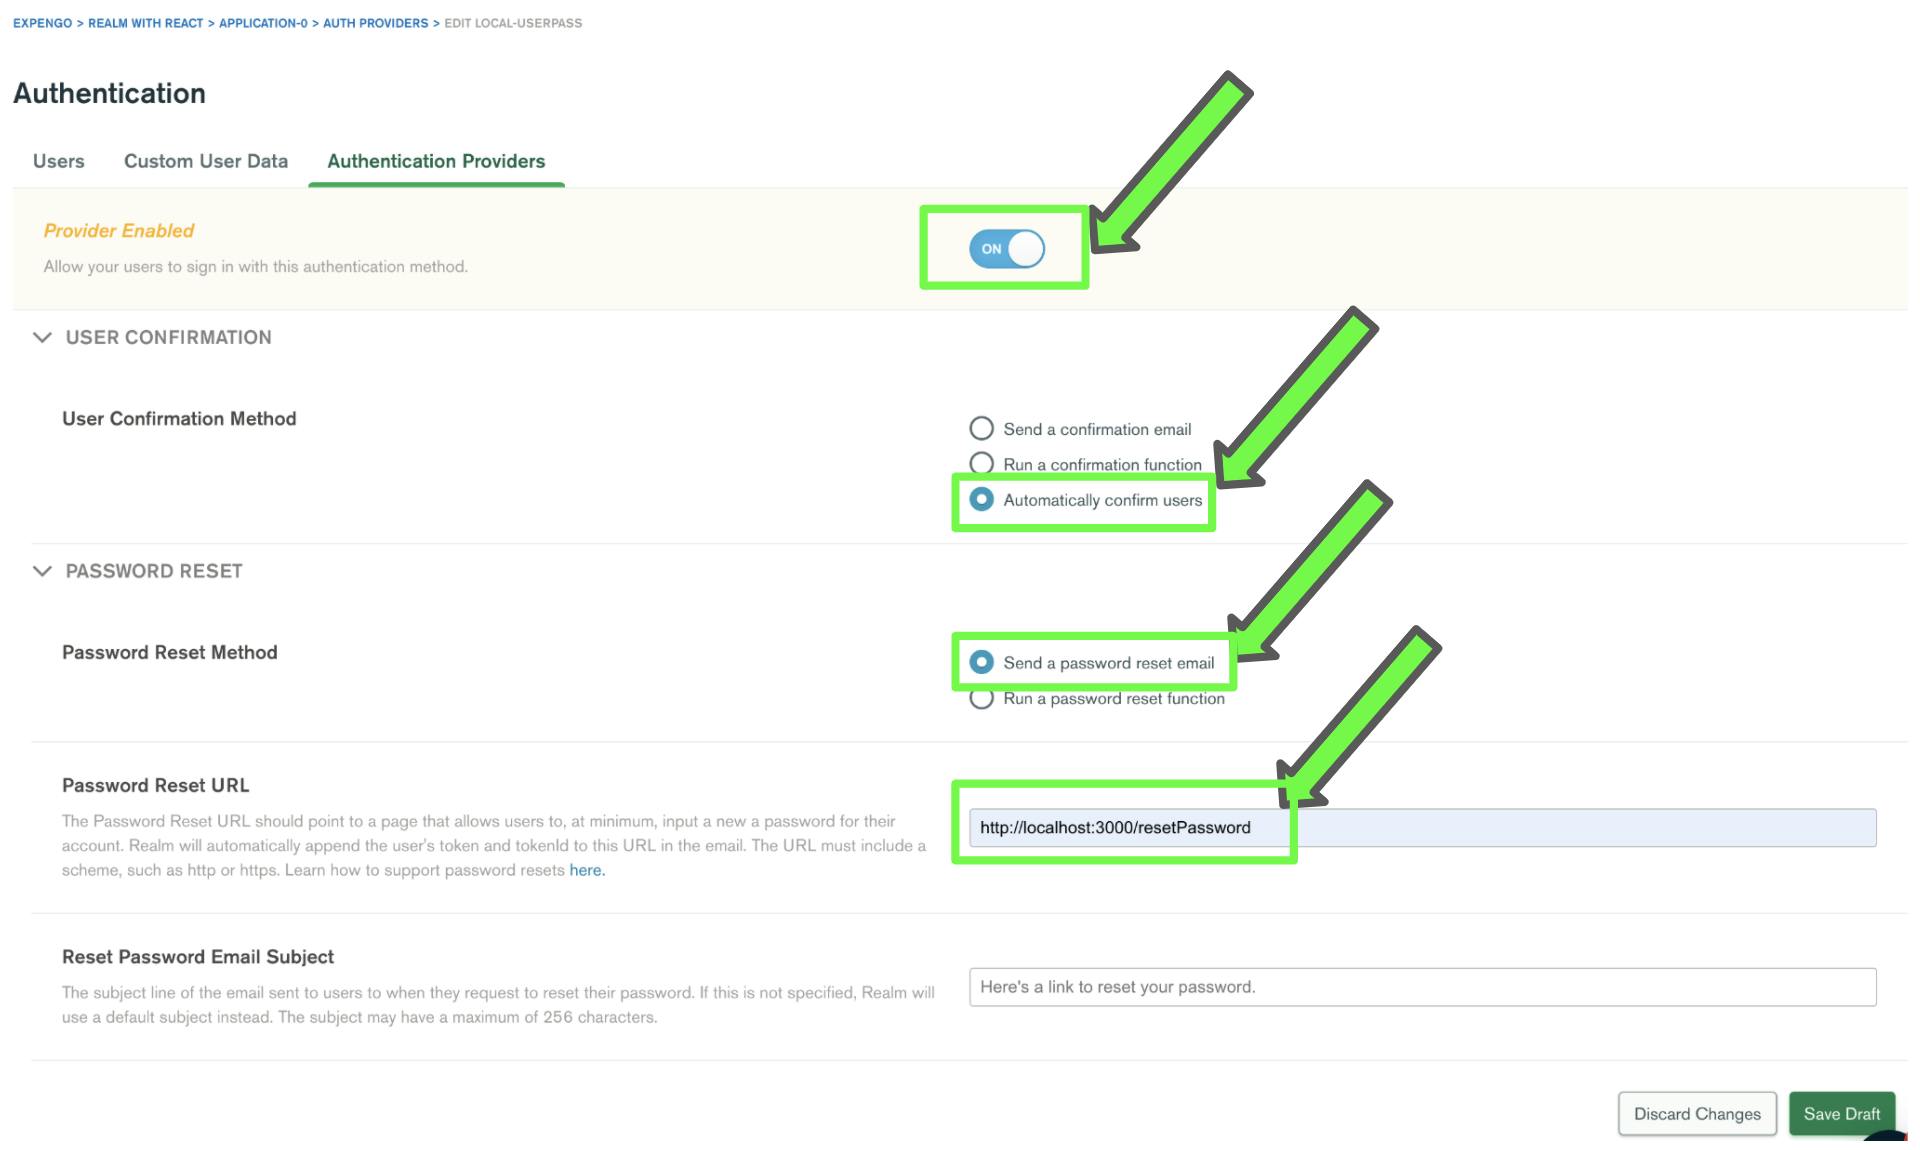
5.) Make sure the Provider Enabled toggle is set to On, for the sake of simplicity of this tutorial we will choose:
- User confirmation method: “Automatically confirm users”
- Password Reset Method: “Send a password reset email”
- Password Reset URL: “localhost:3000/resetPassword”
- And then click “Save Draft”
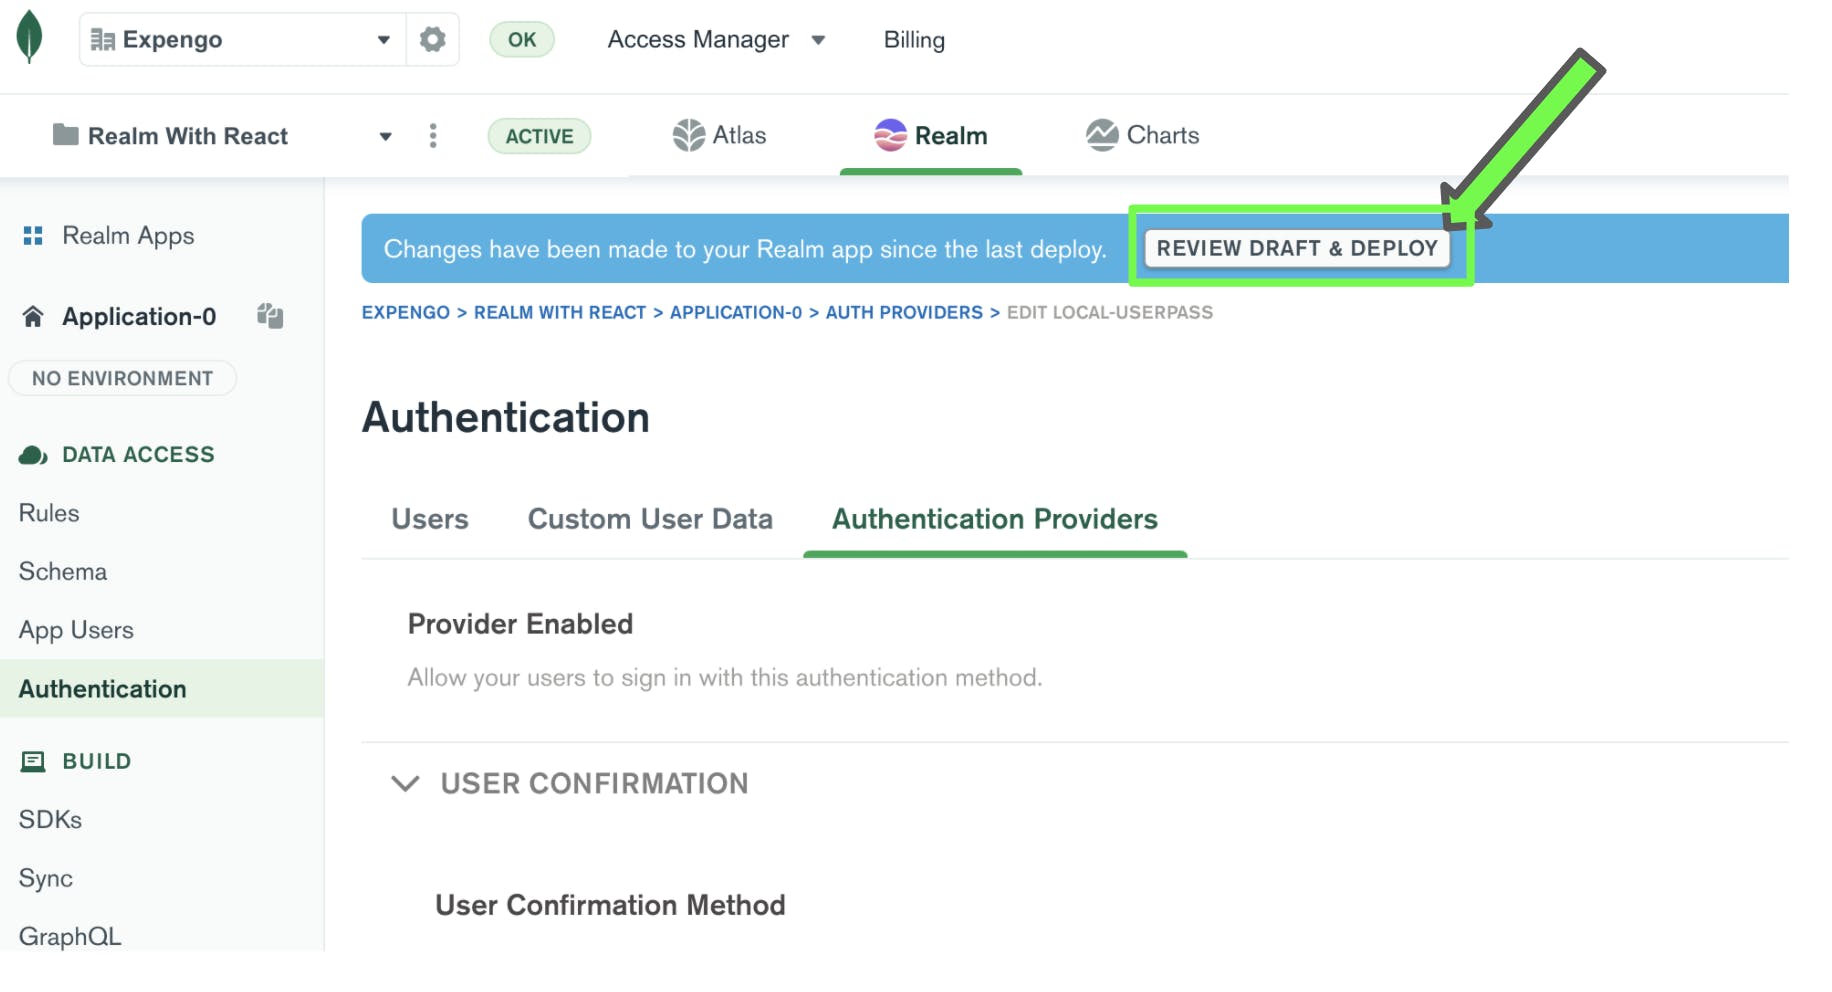
6.) Once your Draft has been saved. You will see a blue popup at the top, with a “Review Draft & Deploy” button, click on it and wait for a few moments.
7.) You will see a “Deployment was successful” message in green at the top if everything goes fine. Yay!

All screenshots were last updated in Feb 2022. Some UX details may have changed in more recent releases. If you find any discrepancies, please feel free to post them on the forum topic I have linked at the end of this tutorial.
Setup your React App
1.) Let’s create a brand new React app. Launch your terminal and execute the following command, where “expengo” will be the name of our app:
npx create-react-app expengo
Make sure you have Node.js & npm installed on your machine.
2.) Let’s install Realm-web into our React app:
The MongoDB Realm Web SDK enables browser-based applications to access data stored in MongoDB Atlas and interact with MongoDB Realm services like Functions, authentication & GraphQL.
npm install realm-web
3.) Let’s install a few npm packages to make our lives easier:
- React-router-dom to manage navigation-related requirements in our app, run:
npm install react-router-dom
- Material UI to help us in building beautiful components without writing a lot of CSS, run:
npm install @mui/material @emotion/styled @emotion/react
4.) Now, let’s create 3 new directories with the following files as below:
./src/pages:
        ./src/pages/Home.page.js
        ./src/pages/PrivateRoute.page.js
        ./src/pages/Login.page.js
        ./src/pages/SignUp.page.js
./src/contexts
        ./src/contexts/user.context.js
./src/realm
        ./src/realm/constants.js
5.) Let’s open this expengo folder in our code editor, if everything has worked fine, our folder should have the following structure:
├── README.md
└──node_modules/
    ├── …
├── package-lock.json
├── package.json
└── public/
    ├── …
└── src/
    └── contexts/
       ├──user.context.js
    └──pages/
       ├──Home.page.js
       ├──PrivateRoute.page.js
       ├──Login.page.js
       ├──Signup.page.js
    └── realm/
       ├──constants.js
    ├── App.css
    ├── App.js
    ├── App.test.js
    ├── index.css
    ├── index.js
    ├── logo.svg
    ├── reportWebVitals.js
    └── setupTests.js
Connect your React App with Realm & handle user management
In this section we will be creating functions & React components in our app to give our users the ability to Login, Signup and Logout.
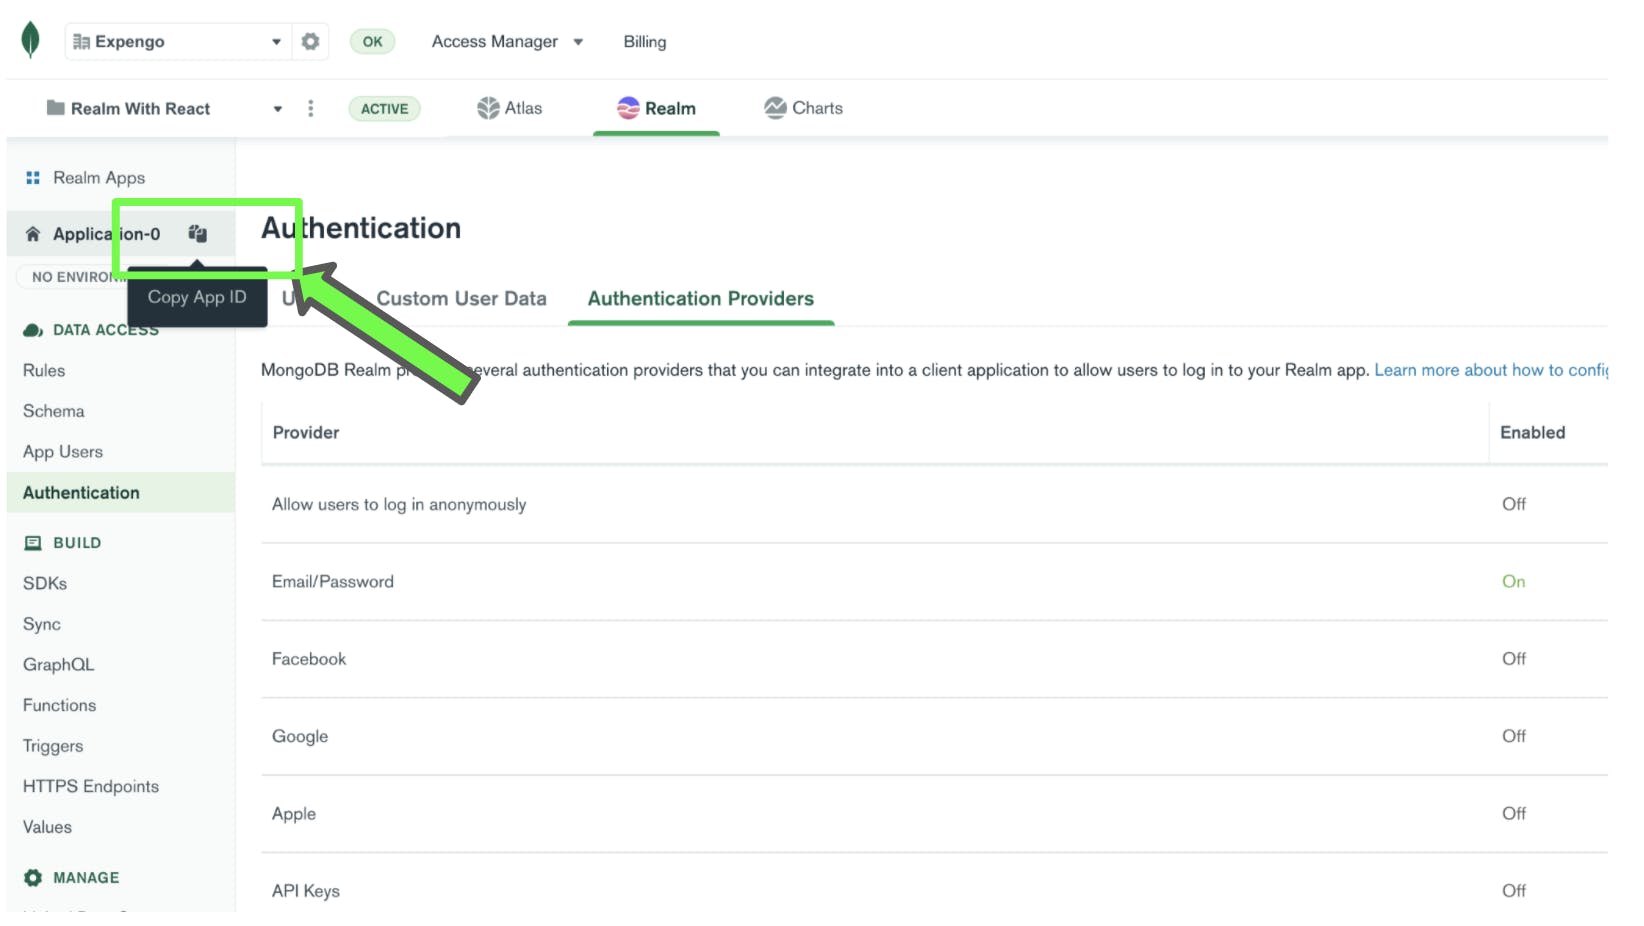
1.) Copy your Realm App ID:
2.) Now open this file: ./src/realm/constants.js And paste the following code and replace the placeholder with your App Id:
export const APP_ID = "<--Your App ID-->";
An app id would something like: application-0-xdchs
3.) Create a React Context for user management Now we will add a new React Context on top of all our routes to get access to our user’s details, such as their profile and access tokens. Whenever we need to call a function on a user’s behalf we can easily do that by consuming this React Context through child components. The following code also implements functions that will do all the interactions with our Realm Server to perform authentication, please take a look at the comments for a function-specific description. For more information, you can refer to the MongoDB docs
./src/contexts/user.context.js:
import { createContext, useState } from "react";
import { App, Credentials } from "realm-web";
import { APP_ID } from "../realm/constants";

// Creating a Realm App Instance
const app = new App(APP_ID);

// Creating a user context to manage and access all the user related functions
// across different components and pages.
export const UserContext = createContext();

export const UserProvider = ({ children }) => {
 const [user, setUser] = useState(null);

 // Function to login user into our Realm using their email & password
 const emailPasswordLogin = async (email, password) => {
   const credentials = Credentials.emailPassword(email, password);
   const authedUser = await app.logIn(credentials);
   setUser(authedUser);
   return authedUser;
 };

 // Function to signup user into our Realm using their email & password
 const emailPasswordSignup = async (email, password) => {
   try {
     await app.emailPasswordAuth.registerUser(email, password);
     // Since we are automatically confirming our users we are going to login
     // the user using the same credentials once the signup is complete.
     return emailPasswordLogin(email, password);
   } catch (error) {
     throw error;
   }
 };

 // Using this function, you don’t need to login the user again and again. You can use this function to check if the user is already logged in.
 const fetchUser = async () => {
   if (!app.currentUser) return false;
   try {
     await app.currentUser.refreshCustomData();
     // Now if we have a user we are setting it to our user context
     // so that we can use it in our app across different components.
     setUser(app.currentUser);
     return app.currentUser;
   } catch (error) {
     throw error;
   }
 }

 // Function to logout user from our Realm
 const logOutUser = async () => {
   if (!app.currentUser) return false;
   try {
     await app.currentUser.logOut();
     // Setting the user to null once loggedOut.
     setUser(null);
     return true;
   } catch (error) {
     throw error
   }
 }

 return <UserContext.Provider value={{ user, setUser, fetchUser, emailPasswordLogin, emailPasswordSignup, logOutUser }}>
   {children}
 </UserContext.Provider>;
}
4.) Create a PrivateRoute Page This is a wrapper page that will only allow authenticated users to access our app’s private pages. We will see it in action while using it in our ./src/App.js file.
./src/pages/PrivateRoute.page.js
import { useContext } from "react";
   import { Navigate, Outlet, useLocation } from "react-router-dom";
   import { UserContext } from "../contexts/user.context";

   const PrivateRoute = (props) => {

     // Fetching the user from the user context.
     const { user } = useContext(UserContext);
     const location = useLocation();

     // If the user is not logged in we are redirecting them
     // to the login page. Otherwise we are letting them to
     // continue to the page as per the URL using <Outlet />.
     return user ? <Outlet /> : <Navigate to={`/login?redirectTo=${encodeURI(location.pathname)}`} />;
   }

export default PrivateRoute;
5.) Create a Login Page
./src/pages/Login.page.js
import { Button, TextField } from "@mui/material";
import { useContext, useEffect, useState } from "react";
import { Link, useLocation, useNavigate } from "react-router-dom";
import { UserContext } from "../contexts/user.context";

const Login = () => {
 const navigate = useNavigate();
 const location = useLocation();

 // We are consuming our user-management context to
 // get & set the user details here
 const { user, fetchUser, emailPasswordLogin } = useContext(UserContext);

 // We are using React's "useState" hook to keep track
 //  of the form values.
 const [form, setForm] = useState({
   email: "",
   password: ""
 });

 // This function will be called whenever the user edits the form.
 const onFormInputChange = (event) => {
   const { name, value } = event.target;
   setForm({ ...form, [name]: value });
 };

 // This function will redirect the user to the
 // appropriate page once the authentication is done.
 const redirectNow = () => {
   const redirectTo = location.search.replace("?redirectTo=", "");
   navigate(redirectTo ? redirectTo : "/");
 }

 // Since there can be chances that the user is already logged in
 // but whenever the app gets refreshed the user context will become
 // empty. So we are checking if the user is already logged in and
 // if so we are redirecting the user to the home page.
 // Otherwise we will do nothing and let the user to login.
 const loadUser = async () => {
   if (!user) {
     const fetchedUser = await fetchUser();
     if (fetchedUser) {
       // Redirecting them once fetched.
       redirectNow();
     }
   }
 }

 // This useEffect will run only once when the component is mounted.
 // Hence this is helping us in verifying whether the user is already logged in
 // or not.
 useEffect(() => {
   loadUser(); // eslint-disable-next-line react-hooks/exhaustive-deps
 }, []);

 // This function gets fired when the user clicks on the "Login" button.
 const onSubmit = async (event) => {
   try {
     // Here we are passing user details to our emailPasswordLogin
     // function that we imported from our realm/authentication.js
     // to validate the user credentials and login the user into our App.
     const user = await emailPasswordLogin(form.email, form.password);
     if (user) {
       redirectNow();
     }
   } catch (error) {
     alert(error)
   }
 };

 return <form style={{ display: "flex", flexDirection: "column", maxWidth: "300px", margin: "auto" }}>
   <h1>Login</h1>
   <TextField
     label="Email"
     type="email"
     variant="outlined"
     name="email"
     value={form.email}
     onChange={onFormInputChange}
     style={{ marginBottom: "1rem" }}
   />
   <TextField
     label="Password"
     type="password"
     variant="outlined"
     name="password"
     value={form.password}
     onChange={onFormInputChange}
     style={{ marginBottom: "1rem" }}
   />
   <Button variant="contained" color="primary" onClick={onSubmit}>
     Login
   </Button>
   <p>Don't have an account? <Link to="/signup">Signup</Link></p>
 </form>
}

export default Login;
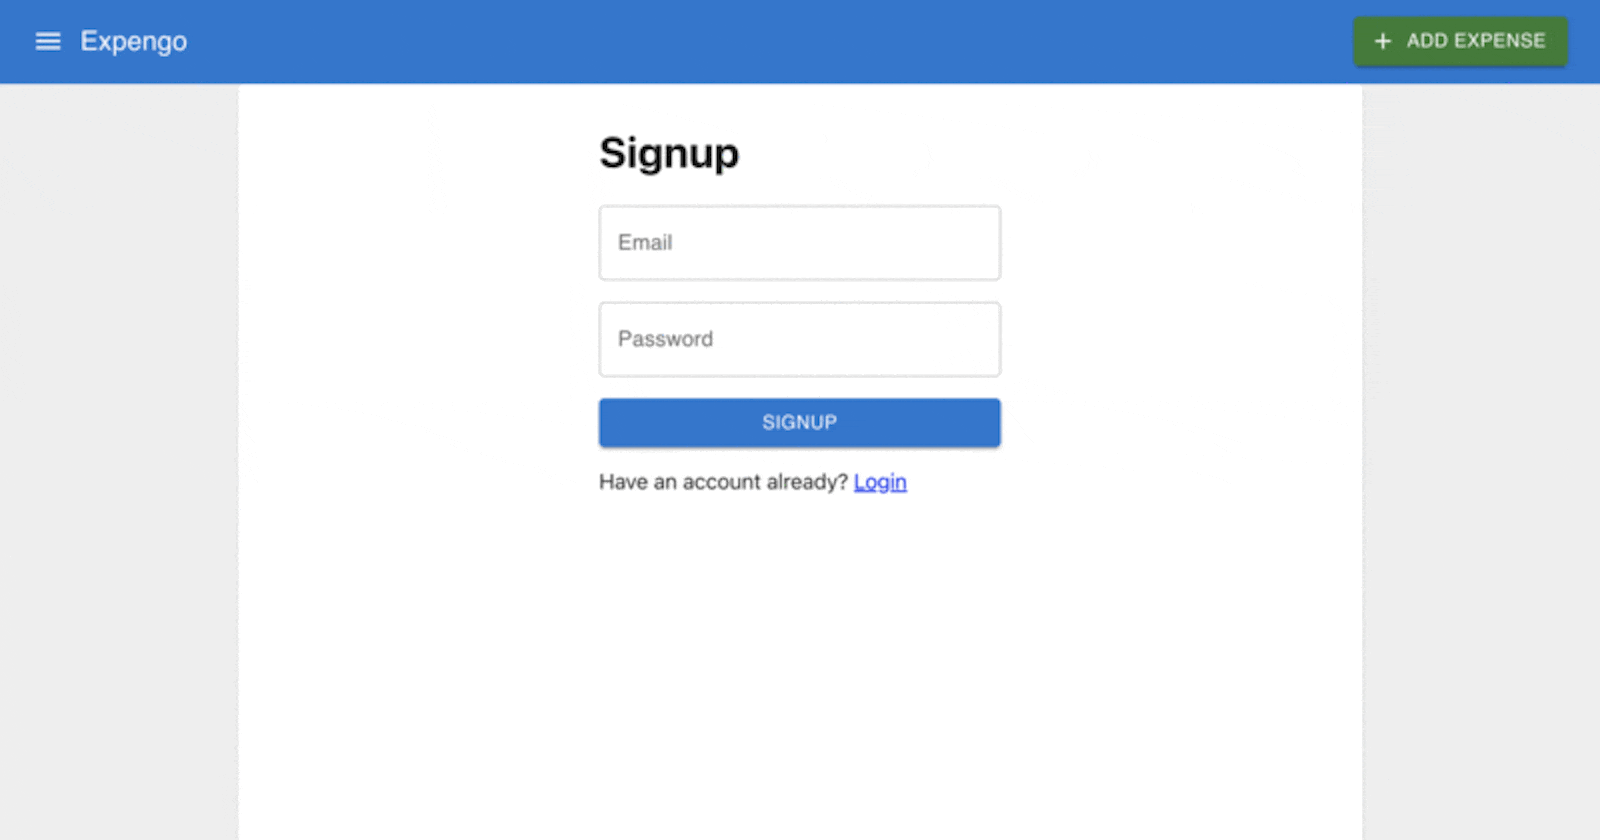
6.) Create a Signup Page
./src/pages/Signup.page.js
import { Button, TextField } from "@mui/material";
import { useContext, useState } from "react";
import { Link, useLocation, useNavigate } from "react-router-dom";
import { UserContext } from "../contexts/user.context";

const Signup = () => {
 const navigate = useNavigate();
 const location = useLocation();

 // As explained in the Login page.
 const { emailPasswordSignup } = useContext(UserContext);
 const [form, setForm] = useState({
   email: "",
   password: ""
 });

 // As explained in the Login page.
 const onFormInputChange = (event) => {
   const { name, value } = event.target;
   setForm({ ...form, [name]: value });
 };


 // As explained in the Login page.
 const redirectNow = () => {
   const redirectTo = location.search.replace("?redirectTo=", "");
   navigate(redirectTo ? redirectTo : "/");
 }

 // As explained in the Login page.
 const onSubmit = async () => {
   try {
     const user = await emailPasswordSignup(form.email, form.password);
     if (user) {
       redirectNow();
     }
   } catch (error) {
     alert(error);
   }
 };

 return <form style={{ display: "flex", flexDirection: "column", maxWidth: "300px", margin: "auto" }}>
   <h1>Signup</h1>
   <TextField
     label="Email"
     type="email"
     variant="outlined"
     name="email"
     value={form.email}
     onInput={onFormInputChange}
     style={{ marginBottom: "1rem" }}
   />
   <TextField
     label="Password"
     type="password"
     variant="outlined"
     name="password"
     value={form.password}
     onInput={onFormInputChange}
     style={{ marginBottom: "1rem" }}
   />
   <Button variant="contained" color="primary" onClick={onSubmit}>
     Signup
   </Button>
   <p>Have an account already? <Link to="/login">Login</Link></p>
 </form>
}

export default Signup;
7.) Create a Homepage A basic page with just a title and Logout button.
./src/pages/Home.page.js
import { Button } from '@mui/material'
import { useContext } from 'react';
import { UserContext } from '../contexts/user.context';

export default function Home() {
 const { logOutUser } = useContext(UserContext);

 // This function is called when the user clicks the "Logout" button.
 const logOut = async () => {
   try {
     // Calling the logOutUser function from the user context.
     const loggedOut = await logOutUser();
     // Now we will refresh the page, and the user will be logged out and
     // redirected to the login page because of the <PrivateRoute /> component.
     if (loggedOut) {
       window.location.reload(true);
     }
   } catch (error) {
     alert(error)
   }
 }

 return (
   <>
     <h1>Welcome to expengo</h1>
     <Button variant="contained" onClick={logOut}>Logout</Button>
   </>
 )
}
8.) Putting it all together in App.js
import { BrowserRouter, Route, Routes } from "react-router-dom";
import { UserProvider } from "./contexts/user.context";
import Home from "./pages/Home.page";
import Login from "./pages/Login.page";
import PrivateRoute from "./pages/PrivateRoute.page";
import Signup from "./pages/Signup.page";

function App() {
 return (
   <BrowserRouter>
     {/* We are wrapping our whole app with UserProvider so that */}
     {/* our user is accessible through out the app from any page*/}
     <UserProvider>
       <Routes>
         <Route exact path="/login" element={<Login />} />
         <Route exact path="/signup" element={<Signup />} />
         {/* We are protecting our Home Page from unauthenticated */}
         {/* users by wrapping it with PrivateRoute here. */}
         <Route element={<PrivateRoute />}>
           <Route exact path="/" element={<Home />} />
         </Route>
       </Routes>
     </UserProvider>
   </BrowserRouter>
 );
}

export default App;
9.) Launch your React app: All have to do now is run the following command from your project directory:
npm start
Once the compilation is complete you will be able to access your app from your browser on http://localhost:3000/
Conclusion
Woah! We have made a tremendous amount of progress. Authentication is a very crucial part of any app and once that’s done we can focus on features that will make our users’ lives easier. Now in the next part of this blog series, we will be leveraging Realm GraphQL to perform CRUD operations. I am really excited about that because the basic stuff is already over xD. In case you have any doubts or concerns, please feel free to reach out to us on Community Forums. I have created a dedicated Forum Topic for this blog where we can discuss anything related to this Blog-series. And before you ask, here’s the GitHub Repository for this tutorial series.